 |
||||||||||||
|
by Ron J. Whitsel. W3RJW |
||||||||||||
|
Antenna installations present many challenges to the microwave enthusiast, not the least of which is the feedline. The popular solution to this problem is to operate with a portable station requiring only a very short connection from the radio to the antenna. Feedline losses are kept low and aiming the antenna is accomplished by the old 'Eyeball and Armstrong' method. This method works fine for portable operation, but is quite untenable for the home station. And besides when a good Tropo duct forms and your 10 GHz station is just a pile of mouse houses in the garage. What good is it?
A solution for the home station is to use waveguide for the feedline. One of the first problems that you encounter is the loop around the rotor. One method might be to use waveguide to coax transitions and a piece of coaxial cable for the trip around the rotor. but coaxial cable at 10 GHz is a dummy load! It would work in some limited fashion, but if you are going to the expense and time to install waveguide then you might as well go the extra mile and use waveguide all the way. But how do we do that you might ask? Fear not there is a way. |
||||||||||||
 |
||||||||||||
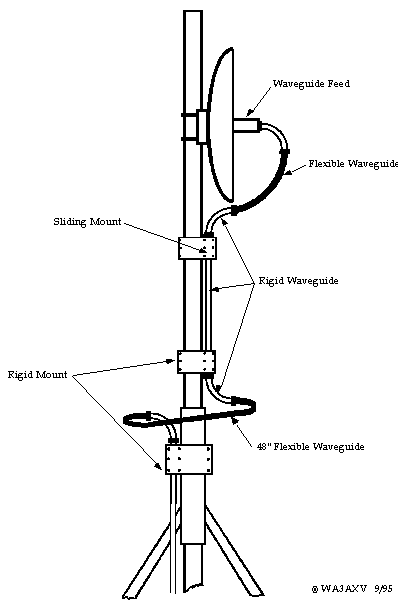
| Flexible waveguide is a viable method of bridging the rotor. Once that problem is solved the rest of the installation is relatively easy. The method described here has been in use at my 10 GHz home station for over a year now with no degradation in performance. Total feedline loss from the shack to the dish is very close to 3.0 dB. Not great if it were 432 MHz, but certainly not too shabby for a home station on 10 GHz. The total run is about 50 feet to the top of the tower and another 15 feet to the dish. I use elliptic guide to the top of the tower and then the setup shown in the drawing above. I don't think anyone needs to be sold on the merits of using waveguide at microwave frequencies whenever possible. See a PICTURE of actual installation.
The flexible guide I used is coated with what looks to be a neoprene rubber. The rubber coating is probably the weak link in the installation. Ultraviolet radiation will most likely destroy the rubber in short time. Experience has shown that wrapping the entire flexible guide with several layers of Scotch 33 or 88 electrical tape (available at most Home Depots) will stiffen the guide and also prevent ultraviolet deterioration. The rubber is not essential to the electrical operation of the guide, but does lend structural stability to the thin, corrugated metal that forms the actual waveguide. After a year with the tape wrapped guide, there has been no problem. The trick to making this system work is to install the flexible guide so that it coils and uncoils in a plane parallel to the ground. The traditional "rotor loop" installation will not work because the guide has very little "flex" in the plane parallel to its wide side. The only real flexibility is in the plane parallel to the narrow side of the guide. Thus if the guide is installed with its narrow side parallel to the ground, the guide will coil and uncoil to provide a full 360 degrees of rotation. |
||||||||||||
 |
 |
|||||||||||
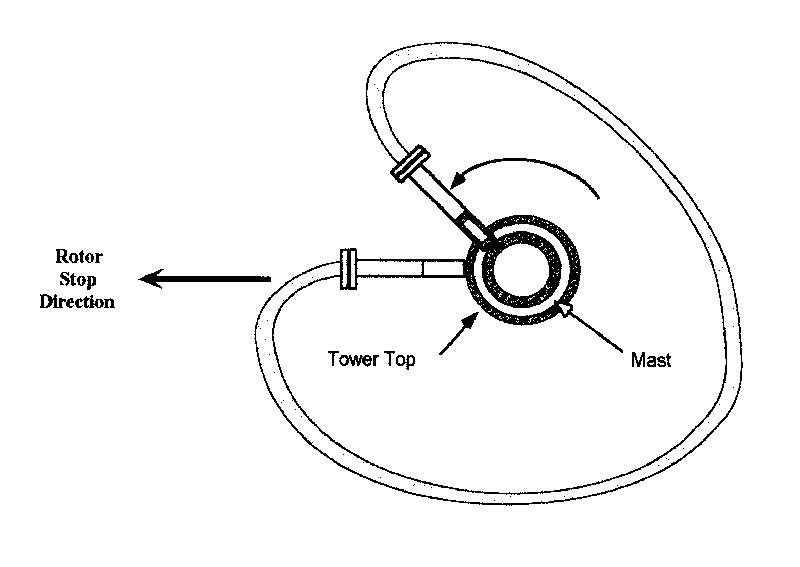
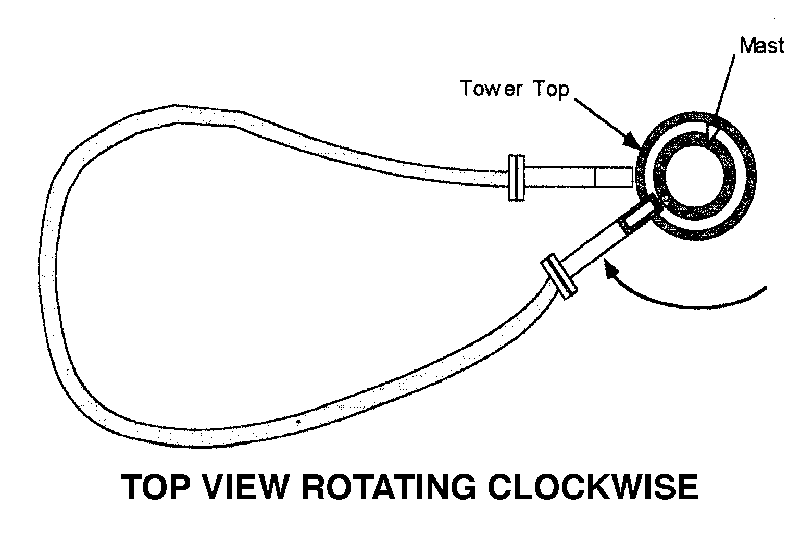
| The diagram at above left shows what happens when the mast is rotated in the counter clockwise direction toward the rotor stop. (Note: It is essential that the non-rotating waveguide be positioned exactly at the rotor stop position.) The guide will form a relatively tight coil around the mast when fully rotated. The 90-degree piece of waveguide must be installed such that it clears the 90-degree waveguide that is mounted on the mast. Don't use more vertical clearance then is absolutely necessary because the guide doesn't like to bend up and down.
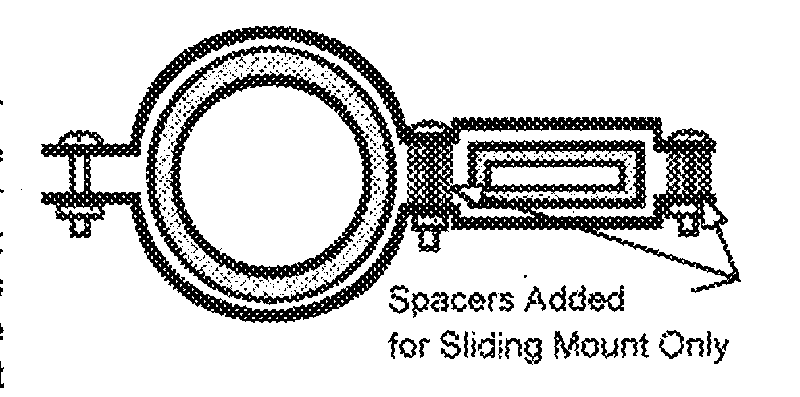
During clockwise rotation the guide will uncoil and form a long thin loop as shown above right. In this position the guide is relatively vulnerable to wind and large birds so don't leave it 'parked' in this position. The safer 'parked' position is with the guide wrapped around the mast to some degree. Another area of concern is the rigid guide up the mast to the antenna. Since the mast will bend in the wind some allowance must be made for this motion. In my installation I formed a bracket out of sheet aluminum for the bottom mount such that it firmly holds the bottom of the guide about one inch out from the mast. This must be a fairly substantial clamp since it must support the entire weight of the waveguide that is on the mast. See diagram below. |
||||||||||||
 |
||||||||||||
| The top bracket is constructed in a similar manner except that spacers are added to prevent tightening the bracket on the waveguide side. Constructed in this manner the guide can "slip" inside the bracket when the mast bends. This method works not only when the wind is parallel to the wide side of the guide, but since the guide will bend in the opposite direction, it also works for that case as well. Also remember, the guide is copper and does some really serious expansion and contraction. This is another reason to provide for some movement. By the way, painting the guide white helps keep the temperature down. Another solution would be to use elliptic guide up the mast.
Now that you have this really low loss feedline proudly dangling from the tower top, you still have a few areas of concern. The first is condensation from the warm moist air inside the house being sucked up this really neat 'chimney' you just installed and thought it was just a feedline. The cold winter weather will condense the water vapor in the guide, from your nice warm house, and eventually form a pool of water inside. Water is not a real good dielectric. The solution is to pressurize the waveguide with dry air or nitrogen. Preparing the guide for pressurization also solves the second problem: small critters taking up residence inside the guide. Some of these little monsters spin really nice cocoons that will ruin your operating day. Pressure windows [1] should be installed at each end of the waveguide run. O-rings must be used between all flange joints (I found suitable O-rings at a home center). (Note: "Choke" flanges have o-ring grooves, "cover" flanges do not. Never use two choke flanges at the same joint.) Either a waveguide connector with a pressure fitting or a pressure inlet flange must be used to allow connection to a dry air or dry nitrogen system. The very least you should do is install all the "pressure components" so that you have a sealed system. The pressure windows will prevent the flow of air up the "chimney" and keep the critters out. If you live in a warm-all-the-time climate or have an unheated shack, then forget the water vapor thing. Practicing safe critter prevention, however, is always required. I used a pyramidal waveguide feed [2] installed in a white plastic pipe (PVC) 'radome' to feed a 24 inch dish (PVC works at 10 GHz). The radome also keeps the weather and critters out of the feed. The flexible guide from the dish to the mast waveguide serves to further isolate the dish from mast movement. PICTURE of dish and feed. Picture of W3RJW's 903 MHz and above tower and antennas showing complete installation of 10 GHz antenna system. Waveguide is the way to go. Most of the components are available at flea markets. With the heavy use of satellite and fiber optic links, surplus microwave link equipment should be more available then ever. Just do it! 1. Andrew Corp. Catalog #36, Page 166 2. "Parabolic Antennas and Their Feeds", Dick Comly, N3AOG, Pack Rat Notes, Sept. 1995, Page 5 |
||||||||||||