by Ron J. Whitsel, W3RJW
![]()
by Ron J. Whitsel, W3RJW
![]()
One of the ways to improve the over all performance of any radio station is to put up bigger antennas. Antenna improvements affect both the transmitted and received signal and thus increase your operating range. Once you reach a certain point, the only practical way to get "bigger" antennas is to put up multiple antennas phased in such a way so that the total gain of the array increases (hopefully). For VHF and above this usually requires the ubiquitous power divider.
Over the years I have built power dividers using coaxial cable or round copper tubing to achieve the necessary matching of the various antennas in an array. Recently, I have been using waveguide to construct 2 and 4 way power dividers. The waveguide has the advantage of being rectangular which greatly facilitates the attachment of the coaxial cable connectors. It is also made of copper, unlike power dividers made of square or rectangular aluminum tubing, which means the whole assembly can be soldered for long lasting, waterproof, electrical connections.
The Theory
A few words on how power dividers work is in order. Once you understand the simple theory of operation of a power divider (combiner also) then you may come up with another way of building 1/4 lambda transmission line transformers that better suits your needs or available materials list. The basic objective is to build transmission lines with the proper characteristic impedance to match two different RF impedances. The shape or size of the transmission line doesn't matter as long as it is the right impedance.
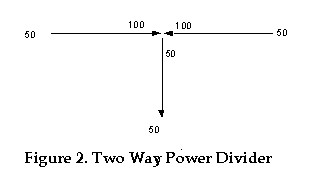
The two most common configurations are intended to combine either 2 or 4 antennas, each with a nominal impedance of 50 ohms. If you were to merely connect 2 antennas with equal lengths of 50-ohm cable together the resulting impedance at the joined ends would be 25 ohms. This really isn't too bad, but we can do better. If we could somehow "transform" the 50 ohms at the end of each cable to 100 ohms, then when we joined the new ends together we would be back to 50 ohms (The impedances combine like resistors in parallel).
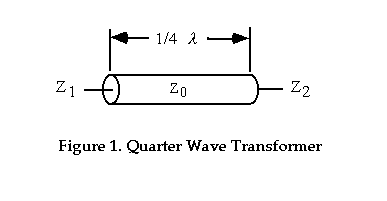
Such an impedance transforming device is an electrical 1/4 lambda (compensated for the velocity factor of the transmission line at the frequency of interest) piece of transmission line having a characteristic impedance (Z0) determined by the following equation:
Z0=Square Root ( Z1 x Z2)
Where Z1=Input Impedance, Z2=Output Impedance (Figure 1.)
In the above example we want to take the 50 ohms at the end of the cable and 'step it up' to 100 ohms. The formula predicts that if the 1/4 lambda transmission line impedance is 70.7 ohms [Sq. Rt. (50x100)], then we will achieve the desired impedance transformation (See diagram below). This 'transformer' effect also works with any odd number of quarter wavelengths (i.e. 3/4 lambda, 5/4 lambda, 7/4 lambda, etc.). Aha! So this is why we used RG-11 (75 ohms) to match two antennas in the good old days. The trick was to get the RG-11 the right length (Odd number of electrical quarter wavelengths). In this case the whole piece of RG-11 was the transformer. If a power divider is being used then the only requirement is that all the 50 ohm 'phasing' lines have to be the same length, any length, but all the same. Much easier! Figure 2. is an impedance diagram for matching two antennas.
In the case of 4 antennas, if we connect two of the antenna feeds together with equal lengths of 50-ohm cable then the impedance at this point is 25 ohms. The transformer has to then step up this 25-ohm load to 100 ohms. Thus when we connect the transformed 100 ohms from the other two antennas, the resulting impedance at the center will be back to 50 ohms (See Figure 3.). From the formula above the transformers required must have a characteristic of impedance of 50 ohms. Once again this could all be done with coaxial cables of the proper length, but it is much easier with a power divider.

What is described here is just one way of building power dividers. There are other configurations such as having two or four antennas connected to one end of a power divider and use a single 1/4 lambda transformer to step up to 50 ohms. The theory is the same for all cases, just different numbers. I think you will find the construction of the actual device is easier in the configurations described here.
Using the Waveguide
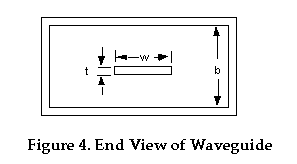
Figure 4. shows an end view of a stripline transmission line. In typical stripline applications the sides are not present. When used as a power divider, the presence of the waveguide sides do not affect the stripline calculations because of the distance of the sides from the center conductor. Eagleware RF design software was used to calculate the width of the center conductor (w) that is required to achieve the 70 and 50 ohm characteristic impedance needed for the 2 and 4 way power dividers. Calculations are provided for .031" and .062" thick (t) material. Use brass shim stock or hobby brass for the center conductors. The thicker material may be necessary only if you contemplate using this technique on the "DC" bands, 220 MHz and below. For 432 and above use the 1/32" (.031") stock. I used WR-90 waveguide (.90"x.40" Inside) for all my power dividers. The smaller dimension is designated as "b" in Figure 4. Dimensions are also provided for WR-75 (.750"x.375") and WR-62 (.622"x.311") guide if that's what you have around. The smaller size waveguides, in fact, would be desirable for 2304 and 3456 MHz where SMA connectors should be used.
The table below gives the dimensions for the center conductor width (w) depending on the type of waveguide used and whether a 2 or 4 way divider is being constructed. Keep in mind that the characteristic impedance is dependent only on the physical dimensions of the guide and center conductor. The length of the center conductor determines the frequency of operation.
|
|
|
|
||||
|
|
|
|
|
|
|
|
|
|
|
|
|
|
|
|
|
|
|
|
|
|
|
|
The length of the center conductor is a 1/2 lambda since these power dividers are actually two 1/4 lambda transmission line sections in parallel. The table below gives the center conductor length (air dielectric) for the bands where stacked antennas are likely to be used. For the 2304 and 3456 bands I recommend building power dividers for 1/3 the frequency. Remember these transformers work on all odd multiples of a quarter wavelength, so a power divider built for 432 MHz will work just fine on 1296 MHz. Likewise, 768 MHz for 2304 MHz and 1152 MHz for 3456 MHz. The dimensions for the higher frequencies get quite small and building becomes more difficult. The larger physical size of the lower frequency version makes them much easier to build. Note: These devices tend to be rather low Q, so don't worry about small dimensional errors.
2304 MHz
(768 MHz)3456 MHz
(1152 MHz)
1/2 Wavelength
(7.68")
(5.13")
1/4 Wavelength
(3.84")
(2.56")
The length of the actual piece of waveguide used is not critical. It can be any length that allows for easy mounting of the RF connectors. The ends can be open or closed. Since weather is probably a concern you should seal the ends. One of the easiest ways is fit a small piece of wood in the opening and seal with RTV. If you feel ambitious you can fit a cap made from copper or brass and solder it in place. Remember there is no need for this end cap to be conductive.
Construction
Both power dividers are constructed in the same manner. Figure 5 shows a two-way divider and Figure 6. shows a four-way divider.
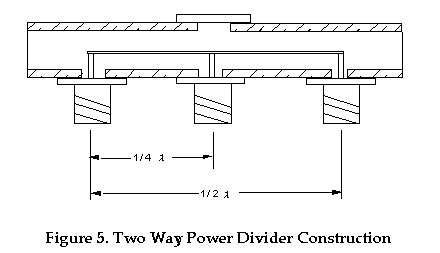
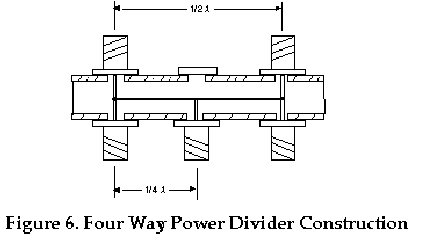
The outside connectors are located 1/2 wavelength apart for the frequency desired. Drill holes that will provide clearance (about 0.625") for the small 'lip' on "N" jacks (Drill through both sides of the waveguide for the four-way) or drill smaller holes (about 0.25") if SMA jacks are utilized. Locate the center between the outside connectors and drill through both sides of the waveguide. The hole opposite the antenna connector will allow soldering the center pin of the connector to the center conductor. This hole has to be covered with a small piece of copper or brass after the power divider is assembled.
After all the holes are drilled, its time to break out the heavy heat. This is not a job for any kind of wimpy soldering iron; a propane torch is required. I have had the best luck with plumbers solder (no acid core and use 'real' lead-tin) and paste solder flux. Shine up all the copper or brass parts with emery paper and lightly coat the areas to be soldered with flux. Put a small amount of flux on the base of the connectors and place in position. Do all three connectors on one side at once. Heat the waveguide until the solder starts to flow under the connector. If the solder doesn't flow freely then there is not enough heat or the parts are "dirty" or oxidized.
SMA connectors can be mounted this way, but be careful for the gold conductive surface is an extremely thin 'flash' coat that is easily damaged. Once the gold is gone you will not be able to solder the connector. An alternative method when using SMA connectors is to heat the body of the power divider (leave the connectors off) with the torch and when very hot use a soldering iron and 60/40 solder to solder the connectors; just like you were soldering to a PC board. Still use the acid flux to prevent the heated copper from oxidizing while it is being heated.
Once the connectors are soldered on one side its time to install the center conductor. A hole drilled in the center of the brass strip (tight fit on center pin) will facilitate soldering the center pin of the center connector. You may have to trim the ends of the connector pins so that the center conductor is positioned in the center of the small dimension of the waveguide. Position the center conductor inside the waveguide and center on the three coaxial connector pins. Solder the center pin first through the access hole and then the end pins through the open ends of the waveguide. Once this is done it's time to turn the power divider over and solder the connectors on the other side if building the four-way and to cover the access hole for both the 2 and 4 way. Use the same soldering procedure as above.
Clean off the excess flux as best you can. Commercial flux remover in a spray can seems to work on either the acid or rosin flux residue. Be careful and use eye protection for all phases of construction and clean up. It is easier to clean off the flux before it fully cools. If you do the cleaning while there is still a little residual heat in the waveguide it will go a lot easier.
Finish up the power divider by covering the ends as discussed above. A coat of paint is optional. Attach equal lengths of 50-ohm cable to all antennas and call CQ.
![]()